Friday 28 September 2012

il y a quatre saisons...

Given the change in the weather and the very definite autumnal feel this week, I decided that we should have a new song which included something about the weather or the seasons.  The song I chose is one that always proves popular in the primary school classes as it has a good catchy tune and the lyrics are simple and repetitive.

The song is called "les quatre saisons", there are four seasons and it can be found and downloaded from skoldo here in the form of an mp3 track and a sheet with the lyrics on:
http://www.skoldo.com/node/2266

The song names the four seasons in French and then goes on to describe the weather for each season.   The opening lyrics are as follows:
Il y a quatre saisons dans une année
le printemps, l'été, l'automne, l'hiver.

This song obviously required a craft activity to do with the seasons and as we hadn't had the paints out for a while I decided to try and find a painting activity to fit the bill.  I stumbled across the blog "the ramblings of a crazy woman" and this great craft activity: http://jennwa.blogspot.co.uk/2008/04/pre-school-seasons-craft.html

To complete this craft yourself at home, you will need the following:
large sheet of construction paper, or we used lining paper (I find this is great for painting as the paint doesn't go through the paper and you can cut of a piece as big or as small as you want)
paint - brown, green, orange, yellow, pink, white, red ( or just the primaries and white and mix your own)
foam paint brush

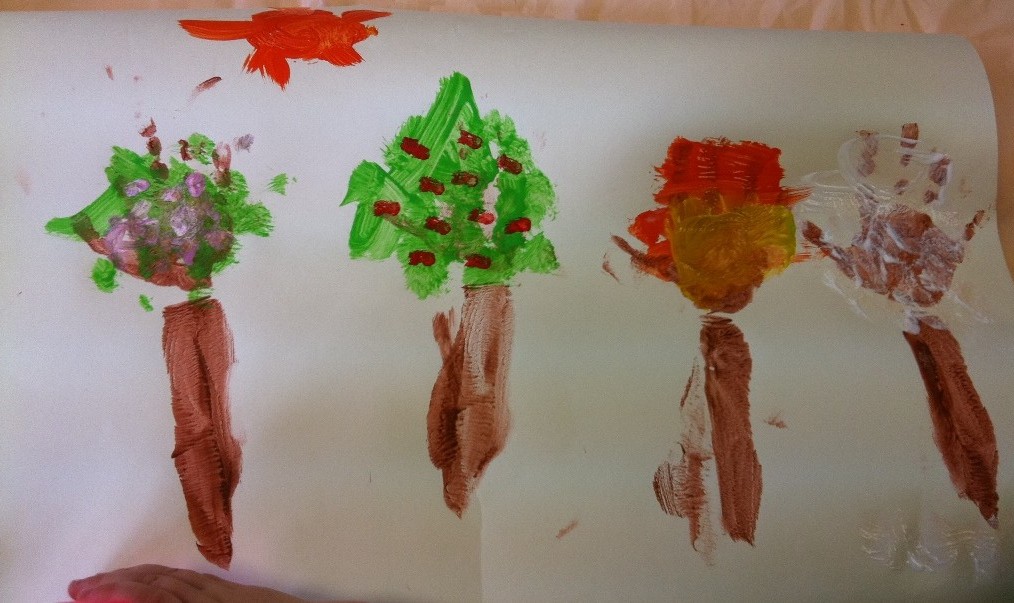
Then just liberally paint your toddler's arm and hand with brown paint a print 4 "trees".

Next, finger paint to make them represent each season.  We did it like this:
Spring - green for leaves and pink for blossom
Summer - green for leaves and red for apples
Autumn - orange, yellow, brown and red leaves
Winter - white snow


Here are our fantastic four seasons paintings for you to enjoy:


Happy singing and painting! :o)

Friday 21 September 2012

un éléphant se balançait...

 One elephant went out to play on a spider's web one day...

I had never heard of this rhyme in English, knowing only the French version - but stumbled across it when looking for craft ideas for this week's new French song.  If you would like to take a look at the English version, you can find it on the sparklebox website here: http://www.sparklebox.co.uk/

Although the 2 versions are slightly different, they are both very sweet and lovely to sing and act out. 

Traditionally, the children would be in a circle with one child in the middle as the elephant, with each verse the "elephant" chooses another to come and play on the spider's web until when there are 5 of them the web breaks and they all fall to the ground.

The French version goes like this:


Un éléphant se balançait

1.          Un éléphant se balançait

sur une toile, toile, toile, toile d’araignée

c’était un jeu tellement amusant

il appela... un deuxième éléphant.

2.          Deux éléphants se balançaient

sur une toile, toile, toile, toile d’araignée

c’était un jeu tellement amusant

ils appelèrent... un troisième éléphant.

3.          ils appelèrent... un quatrième éléphant.

4.          ils appelèrent... un cinqième éléphant.

5.          Cinq elephants se balançaient

sur une toile, toile, toile, toile d’araignée

c’était un jeu tellement amusant

que tout d’un coup – BA DA BOUM!
 
The tune can be found on the brilliant Mama Lisa's website: www.mamalisa.com 
For those of you that are not familiar with this website it is an absolute treasure trove of children's songs and rhymes from around the world with mp3's of the tunes so that you can have a go at singing them yourself!  Well worth a visit! :o)
 
Our craft activity this week was to create our own spider's web with 5 elephants.
 
To make your own, you will need:
a paper plate,
scissors,
wool,
sellotape,
five little elephant blanks on thin card
feltpens, glitter, etc for decorating
 
The instructions are as follows:
1. Snip small triangles around the edge of your paper plate.
 
2.  Weave over and around the plate with the wool randomly to create your web.
 
3. Colour in the elephants and number them 1 to 5
 
4.  Add any other decoration to your web/plate/elephants as you wish
 
5. Stick the elephants on to the plate.
 
Here are our finished spider webs and elephants:


A simple but effective craft idea I think!
Happy singing and crafting! :o)


Saturday 15 September 2012

Cher Zoo...

This week, as a change from all songs, I decided to add a story at the end of our sing-song and relate our craft activity to this.  As you will know if you have read my first book review - I will get round to doing another one soon I promise! - Rod Campbell's Dear Zoo/Cher Zoo bilingual text is a real favourite with Little Imp at the moment.  We have been reading it at least once a day since our visit to the zoo on holiday and she is getting really good at naming the toy animals in French as well as English when we play with those.  It seemed, therefore, an obvious choice for a story - plus I had come across this lovely craft idea when googling last week and I thought the children would have fun making it so, decision made!

Now, in all honesty, there is a big difference between reading a story to one Little Imp on your knee and trying to show the pictures to a wriggly bunch of toddlers (and they were quite wriggly having danced around pretty energetically to the Hokey Cokey in French as well as ainsi font and meunier tu dors amongst others!), whilst simultaneously remembering the French text - but I think they all enjoyed it!!  They all stayed sitting and looking at the book so that must be a good sign! I guess we'll know for sure next week if they want to hear the story again!!  Anyway, even if the book wasn't as successful as the songs and rhymes are, I think it is valuable to include one every so often as it widens the language introduced quite significantly and also introduces French in another format.

If you don't have a copy of the book in French, it is possible to make your own simple French translation with a few phrases and the animal names and descriptions.  If you don't feel confident enough to ad lib the French, you could write out the phrases first and blu tac them into the English version to give you a prompt as you read it, I'm sure your little one wouldn't mind! :o)

The craft idea, is very simple to make but also very effective.  The original version I found on the web calls for animal crackers - now I had planned to substitute these for the chocolate animal biscuits that you get here in the UK, but decided that the Zoo would be a bit redundant once the biscuits had been eaten, and so I decided on Foam animal stickers as well.  The local Co-op and Spar both let me down unfortunately though - not a chocolate animal biscuit to be found :o( - so it was a good job we had the foam animals!
The original craft idea complete with edible animals can be found here:
http://www.allmylittlegems.com/2012/03/zoo-craft-for-kids-preschool-fun.html

Anyway, to make your our version of the Zoo you will need:
1 piece of A4 card,
4 or 5 pipecleaners
a hole punch
foam animal stickers or equivalent,
felt pens/crayons/glitter glue - to decorate your Zoo as you wish

1. Fold the card in half
2. Unfold and on the inside draw a rectangle on one half - leave enough of a border around the edge to allow for the holes to be punched
3. Cut out the rectangle and re-fold the card
4. Punch 4 or 5 pairs of holes along the top and bottom edge of the rectangle - try to line them up if you can
5. Stick your animals on to the card so that they can be seen through the cut out rectangle and decorate the zoo as you wish
6. Thread your pipe cleaners through the holes to make the bars, just twist the ends around to secure them

Here is how we all got on:


Hope you have lots of fun reading the story yourselves and creating your very own zoo! :o)

Saturday 8 September 2012

Nounours, nounours...


I think everybody knows the children's action rhyme/song Teddy bear, teddy bear.  Well, I'm not sure how authentic it is but when I stumbled across a French version I decided it was one that we had to give a go at our toddler group.  The words are not an exact  translation from the English as clearly it still needs to rhyme, but the children seemed to find it just as enjoyable to act out this version.
 
The lyrics to the French version are as follows:
 
Nounours, nounours,
touche le nez.
Nounours, nounours,
touche les pieds.
Nounours, nounours,
saute en l'air.
Nounours, nounours,
tombe par terre!
 
Literally translated into English:
 
Teddy bear, teddy bear,
touch your nose.
Teddy bear, teddy bear, touch your toes.
Teddy bear, teddy bear,
jump in the air.
Teddy bear, teddy bear,
fall to the ground!
 
Of course, we needed a teddy bear craft to go with our new song.  Each toddler was provided with a teddy bear template printed on card and then had free choice from the crayons, felt pens, glitter glues, stickers, felt, cupcake cases, doilies, material, ribbons, fabric petals, wool, foam, tissue paper, googly eyes, etc. from the craft table.  I was amazed by how different all their finished teddy bears looked - they really are a very creative bunch (us Mummys only have very minimal input - honest!).
 
Here are our finshed teddy bears!  We hope you have as much fun trying out the song and craft as we did! :o)


Saturday 1 September 2012

Sur son petit cheval gris...

This week saw us all pretending to ride our multi-coloured horses to various towns and cities in France.  Our new rhyme was "Sur son petit cheval gris" which is an action rhyme to do on a grown-ups knee - think "this is the way the children ride" and you're on the right track.

So, the rhyme tells the story of a little boy called Jeannot and how he rides his horses to different places.  The town/city name is chosen to rhyme with the colour of the horse - e.g. Paris and cheval gris.  The actions are riding "au pas" - slowly, "au trot" - a bit faster, and then finally "au galop" - as fast as you like!

If you would like to give it a try at home, the words are as follows (of course, you can change the towns and colours as you wish!):


Quand Jeannot va à Paris
sur son petit cheval gris
Il va:
au pas, au pas, au pas.

Quand Jeannot va à Rouen
sur son petit cheval blanc
Il va:
au trot, au trot, au trot.

Quand Jeannot va à Quimper,
sur son petit cheval vert
Il va:
au galop, au galop, au galop.


To accompany our rhyme, this week our craft activity involved making a horse picture, the inspiration came from here: http://www.allkidsnetwork.com/crafts/animals/farm/footprint-horse.asp

And this is how we did it:

1.  To make our horse's head, we drew around our feet - just the basic outline, don't draw around the toes!

2.  To make the horses neck, cut a rectangle of paper and then cut off at an angle once you have positioned it on the background paper.  To make the mane you can let your toddler practice their scissor skills by snipping into one edge of the rectangle.

3. Glue the neck and head onto your paper and then add googly eyes, two triangle ears and make a forlock from ribbon, wool, etc.  Draw on nostrils and a mouth.

4.  Add the background detail to your picture.  We added things like grass at the bottom and the sky with a sun at the top.  We also used foam craft sticks to make a fence.

Here are our finished horse pictures - I think you will agree that they are pretty fabulous! :o)